So your corn was planted late and got damaged by frost, or maybe it wasn’t quite fully mature when you harvested. You ended up harvesting low-test-weight corn. Now it needs to be dried and stored. Storing in your own bins may provide some marketing advantages. There may not be much tolerance for lower-quality grain sold at harvest, since everyone is just trying to move corn as quickly as possible. But by waiting until the harvest rush is over you may be able to negotiate better terms for lower-quality corn with your buyers.
If you choose to store it, how can you improve your chance of storage success, and minimize the risk of spoilage?
Dry it slowly
Corn test weight generally increases during the drying process. Contrary to some of the #testweightdebate discussions on social media last year, higher test weight does not necessarily mean higher yields or greater profits. Test weight is a grading factor, and in some cases low test weight corn may be subject to a discount when it is sold.
The drying process offers an opportunity to increase test weight, sometimes enough to increase the grade level. The hard starch in the corn kernel is denser than water. When water is removed through drying, the kernel density increases and therefore so does the test weight.
Drying corn too quickly or at too hot a temperature will minimize the increase in test weight. When low test weight is a concern, drying grain more slowly at lower temperatures can increase test weight more than drying faster and/or hotter. In addition, lower-temperature drying reduces heat stress and cracking.
To optimize your grain drying temperature for maximum test weight improvement, follow these steps:
- Measure corn moisture and test weight going into the dryer.
- Start the dryer, set to a reasonable temperature (depends on type of dryer) and wait for dryer to stabilize (may take a couple of hours).
- Measure test weight of corn dried at the starting temperature.
- If the test weight has increased, lower the drying temperature by about 10°F (5°C) and wait for dryer to stabilize (may take a couple of hours).
- Measure test weight of corn dried at the lower temperature.
- If the test weight has increased again, repeat steps 4 and 5.
- When test weight no longer increases, raise the drying temperature by about 10°F (5°) and continue operating at that temperature.
Slow cooling of corn also improves grain quality and test weight, and can save some drying cost. Hot corn (110°F-130°F and 16-17% moisture) can be put straight from the dryer into a storage bin with a large fan (1 HP per 5000 bushels). Slowly cool it by starting the fan when 12 inches of corn covers the bottom of the bin, and continue running the fan 24 hours per day until the bin is full and the corn is cool. The corn may take 1-2 weeks to fully cool. The residual heat from the cooling process will slowly extract the final 1-2% moisture, while preventing “thermal shock” and stress cracks that often happen when corn is cooled more quickly.
How much can test weight increase?
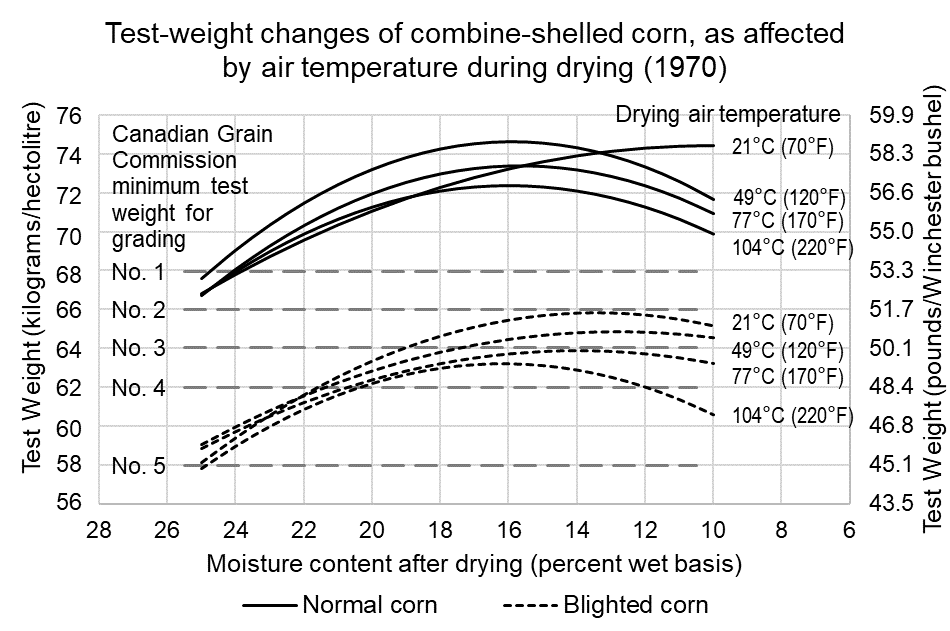
An old study done in the United States in 1970 demonstrated the increase in test weight when drying at various air temperatures. The study looked at both “normal” corn, and corn that had been affected by southern corn leaf blight, resulting in lower-than-normal test weights. When corn was dried, it gained in test weight. Corn dried at a lower air temperature gained more test weight. In some cases, test weight increased enough to move the corn up one or even two grade levels (see Figure 1). However, over-drying in some cases led to test weight reduction.
Cleaning considerations
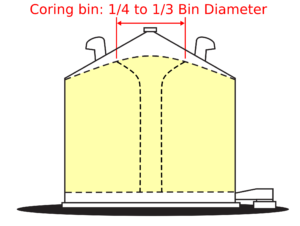
Fines and chaff can be a big problem with immature or frost-damaged grain, especially if it has been dried hot and cooled quickly. Stress cracks from the drying process can easily turn into broken kernels and fines when grain is handled. High levels of fines cause uneven airflow through the bin during aeration, and make grain more susceptible to spoilage. Cleaning grain to remove fines before storage may be particularly beneficial for frost-damaged grain. At a minimum, core storage bins immediately after filling, by removing grain from the unload auger until an inverted cone approximately 1/4 to 1/3 of the bin diameter is visible on top. Because fines tend to collect in the centre, coring the bin removes the bulk of fines for a more uniform storage environment. If fines are not removed, they can “set”, causing everything to stick together and making management and removal of grain much more difficult.
Handling and Storage
Handling corn can lead to more breakdown of kernels, so handle as little as possible. Try to put the grain into one bin and keep it there, don’t move it around unncessessarily. If possible, store the grain in different bins based on test weight and quality. Mixing poor grain with good grain in the same bin can lead to storage problems down the road. Core bins once they are filled, and sell the cored grain or clean it and return it to the bin.
Frost-damaged and immature corn will go out of condition more quickly and break more easily, even at low moisture levels. Expect the storage life to be only half that of normal corn. Aerate the stored corn frequently to keep the temperature stable and moisture levels low. Cool the grain down below freezing over winter, and sell the corn before summer. Markets do exist for low-test-weight corn, and quality will not be significantly reduced when the storage is managed well.
Comments are closed.